Overview
Robotic Process Automation (RPA)
End repetitive work with unlimited bots.
Appian’s Low Code RPA is to transform mundane, repetitive human tasks, such as filling out an insurance form or looking up a registration number online, into robotic tasks. With the Task Recorder, users can record their daily task once and have the robot execute the task as many times as they want.

Task Recorder
To record the task, users can use the Task Recorder to automatically record the task while users interact with the elements on the screen. To record user actions, task recorder identifies the element through accessing its underlying code, eg. element's name or CSS #id selector.
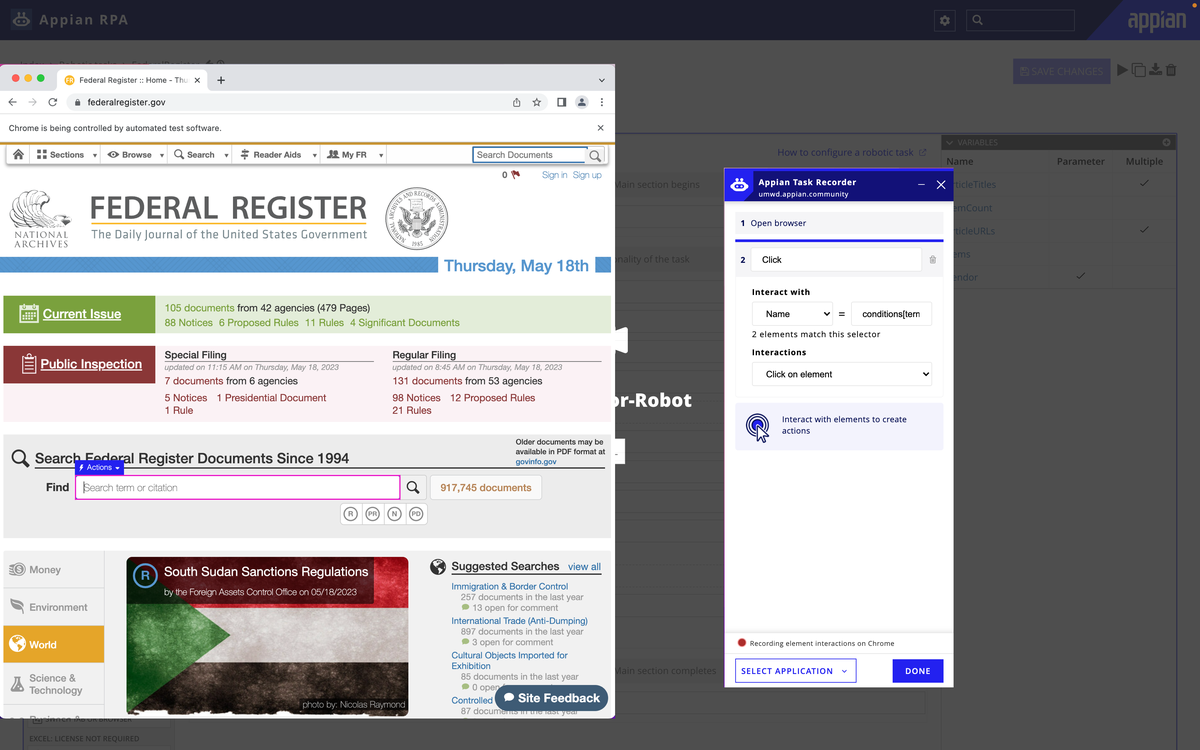
The example above shows how the task recorder records the action of clicking into the search bar by identifying the name of the search bar element.
Defining the Problem
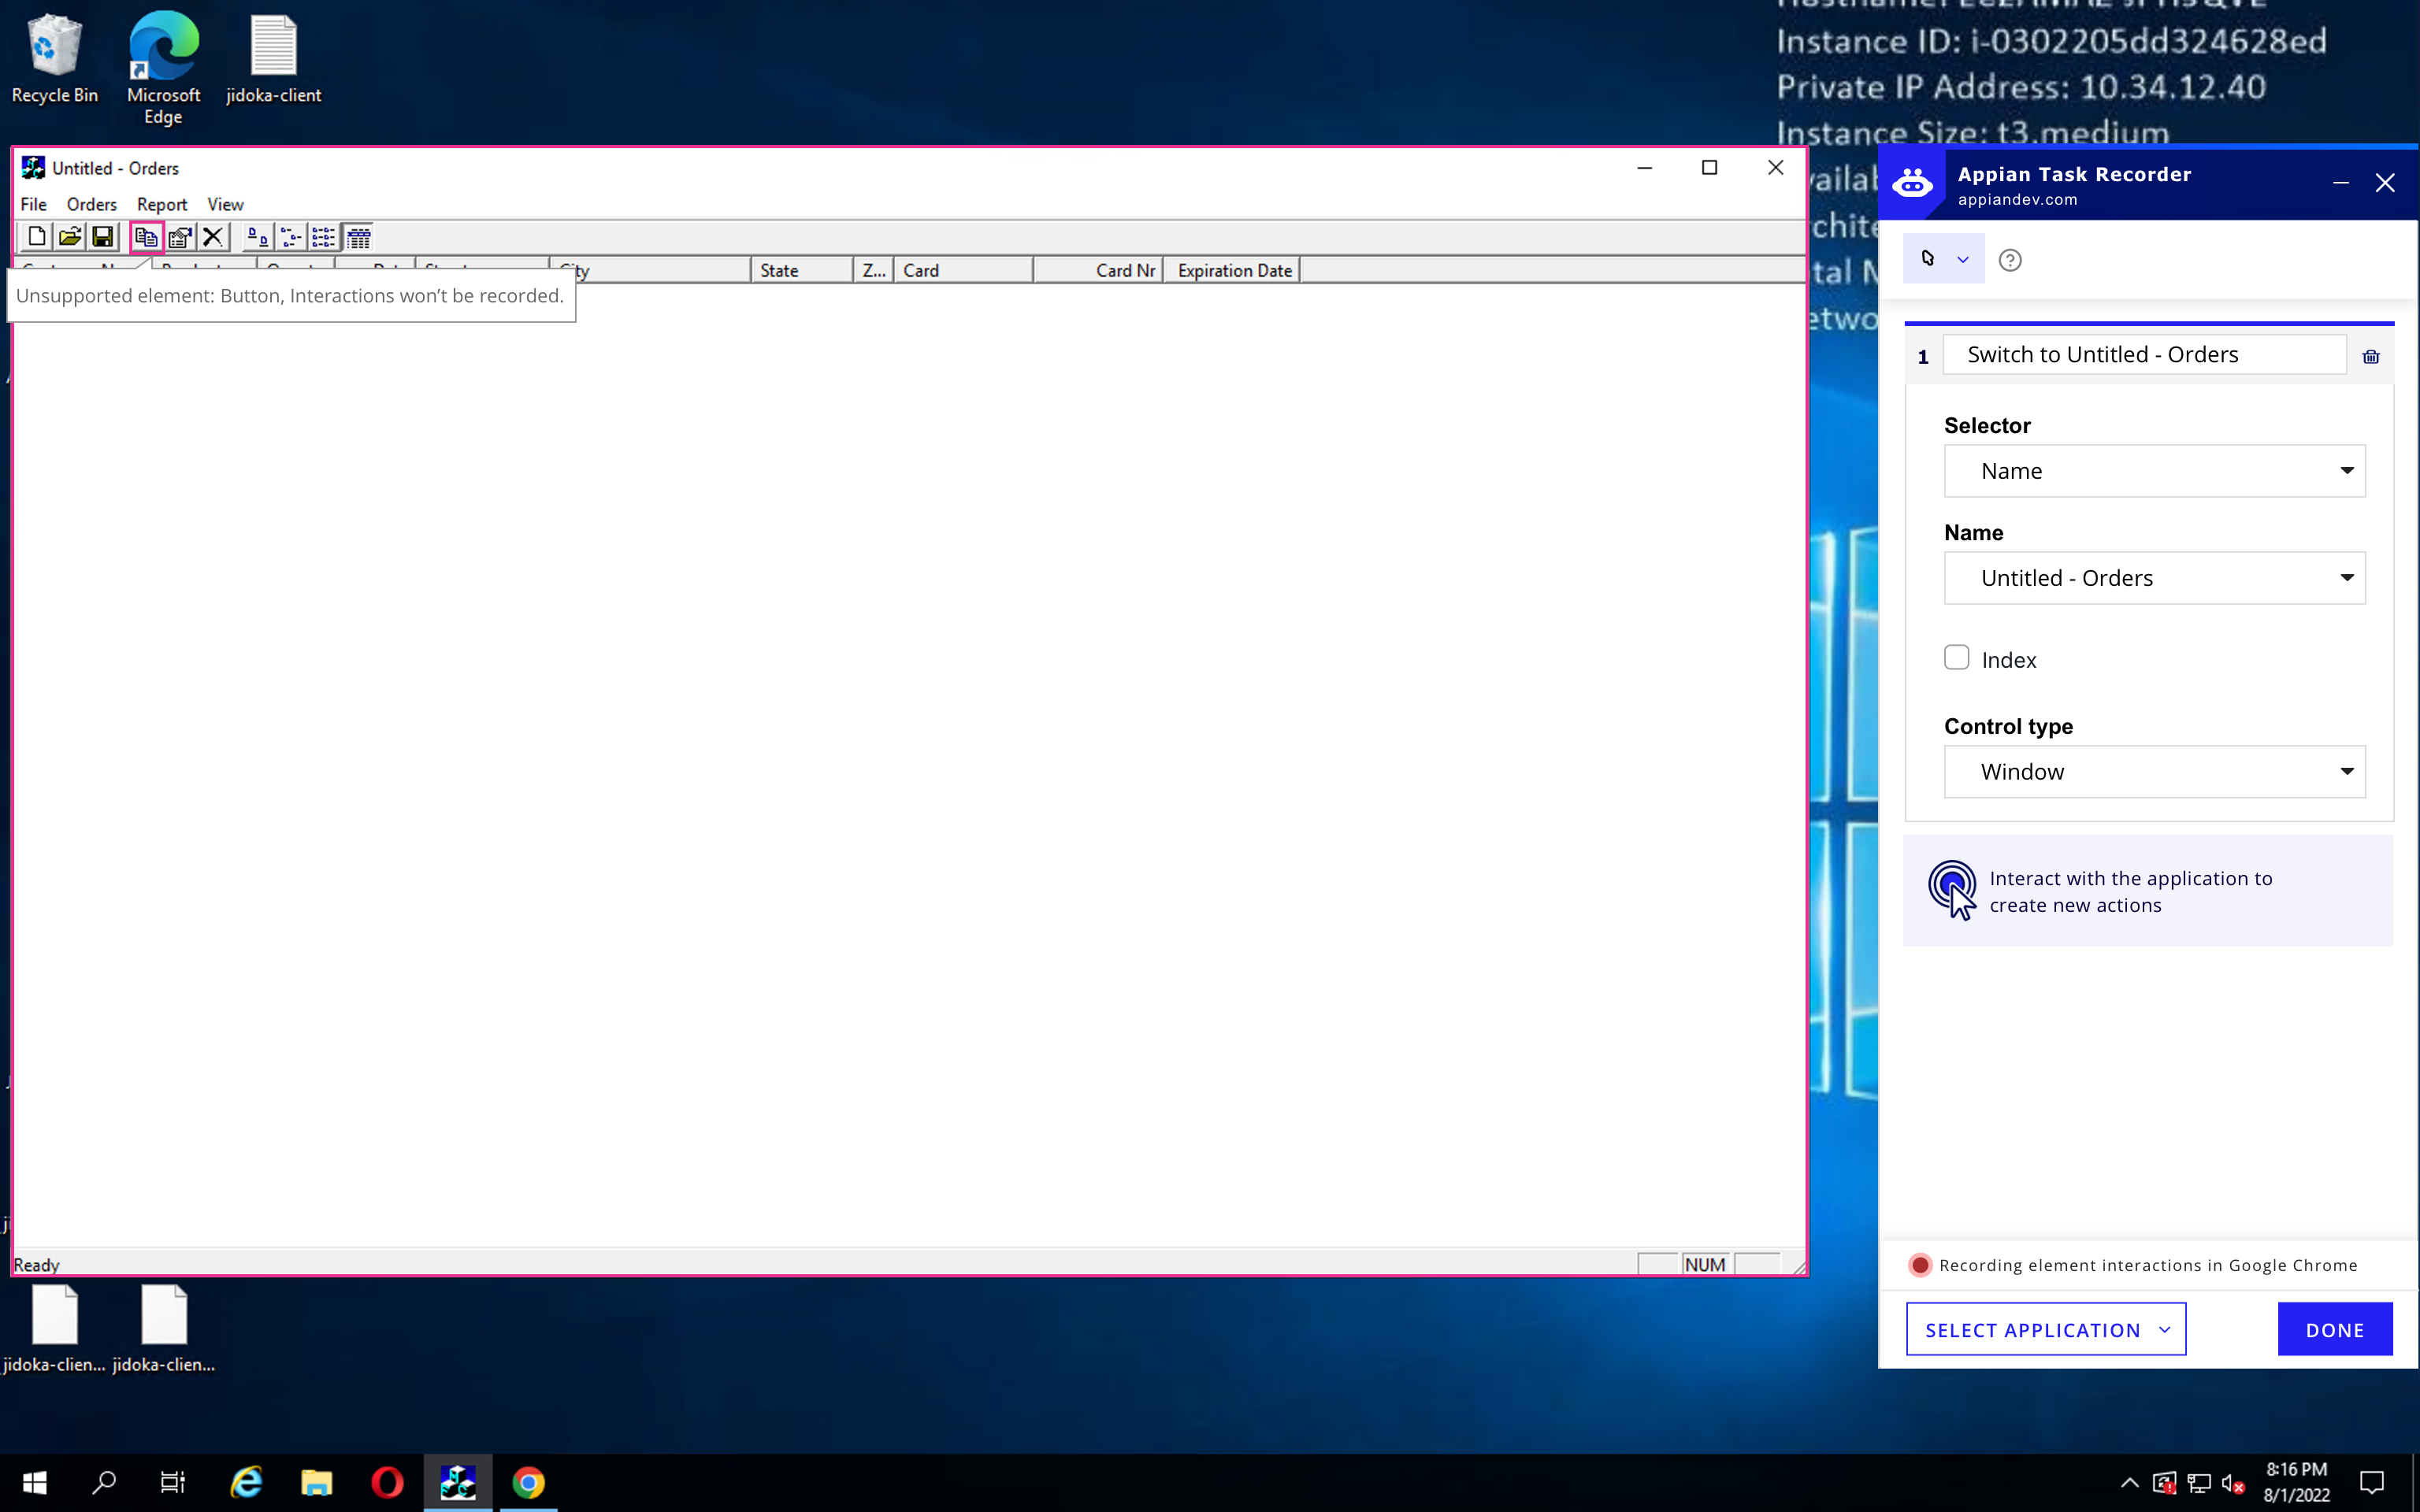
When the system doesn't have access to the underlying code
Sometimes, Task Recorder can’t identify the underlying code of an element, such as when using a virtual machine. Users have to use an external screenshot tool to take a screenshot of the element, than manually upload the screenshot to the robotic process as an identifier of the element.
This breaks the Task Recorder's user flow, and makes it a lot harder for user to navigate the process. Below is the example of the external image capture tool and manually configure image recoginition in the task recorder.

How can we incorporate a Image Capture Mode into the Task Recorder?

We started the design process by collaborating with the PM to write a UX Brief to get an initial understanding of the problem:
UX Brief
- Feature Summary
- Problem Scope
- Target Users
- Ideal User and Business Outcomes

User Interview
After understanding the feature’s target users as both new and experienced Appian Developers who need to configure robotic processes, we conducted user interviews with 4 Appian Developers from the Costumer Success Department with varying levels of familiarity with the Task Recorder.
3/4 users zoomed in to capture their images.
2/4 users mentioned having to take multiple images for their use cases.
3/4 users didn’t edit the detail configurations (resolution, padding, etc.) of the screenshots.
4/4 users had no specific naming conventions, but wanted the images to be findable.
Zooming in/out is of top priority.
Taking multiple screenshots for one element is of lower priority.
Detailed image configurations should be a hidden feature (expand to see) and not highlighted in the design.
Image names can be set to default, while giving users the option to rename.

User Flow Mapping
Based on the data collected and the analysis, we mapped out an initial user flow that outlines how users can switch to Image Capture Mode within the Task Recorder. This mode allows them to take screenshots of uninteractable elements while the screen freezes, then switch out to Interaction Mode after screen capture is done.
However, one question remains: how does the system record actions user performs after they screen-captured the element?

Solution Finding: Low-Fidelity Prototypes
The majority of our solution finding process happened when we iterate using low-fidelity prototypes. This is the fastest way for us to visualize and test out potential designs.
Through constantly being challenged by my Head of Design in the review sessions, this iterative process allowed us to think creatively and outside of the box: challenge the established design conventions while keep a consistent user flow. Each iteration and critique drives us to a more intuitive user experience for a complex B2B user flow.

Iteration 1: A Seperate Image Capture and Interaction Action
The first iteration of the design focuses too much on designing the "perfect screen capture tool".
We dived into the rabbit hole of screen capture, guided by the apparent title of the project, "Image Capture Mode". We came up with multiple designs on recommending padding space, zoom in/out, taking multiple screenshots, etc.
How to combine user action with the captured element becomes a roadblock. In this iteration, we designed a separate "image capture" action as the first step. In the next step, user then needs to perform a click on the screen for Task Recorder to record a click action, or manually add a click in the locate image action.
Perform click sction for the task recorder to record user click. User then manually link two actions together.


Or manually select the "Record Click" checkbox in the locate image action.
Design feedback: Both flows are not intuitive. The first flow adds technical difficulty for implementation. In the second flow, the "Record Click" button can be easily overlooked.
To capture a screenshot?
Or to allow users to interact with otherwise non-detectable elements?
.jpg)
Iteration 2: Focus on recording the interaction itself
Studying the existing logic of Task Recorder's Interaction Mode, we found this pattern blow:
.png)
Can we use the same logic to design Image Capture Mode? Essenetially, the Imaga Capture Mode is to identify elements through "Image", instead of code selectors, while everything else remains the same. Can we treat "Image" as a type of selector as well?
.jpg)
Under "Interact with", "Image" becomes a type of selector when Image Capture Mode is turned on. The rest of the design logic stays the same.
Iteration 2 allows the same logic of the Interaction Mode be applied to the Image Capture Mode, making it intuitive for users to switch between modes.
It's the result of advocating for users, subtraction, and always going back to the "why" of the project.
High-Fidelity Prototype
Enter Image Capture Mode
We prompt users to use image capture mode when they interact with an element that is currently unsupported with the Task Recorder (due to lack of access to underlying code).

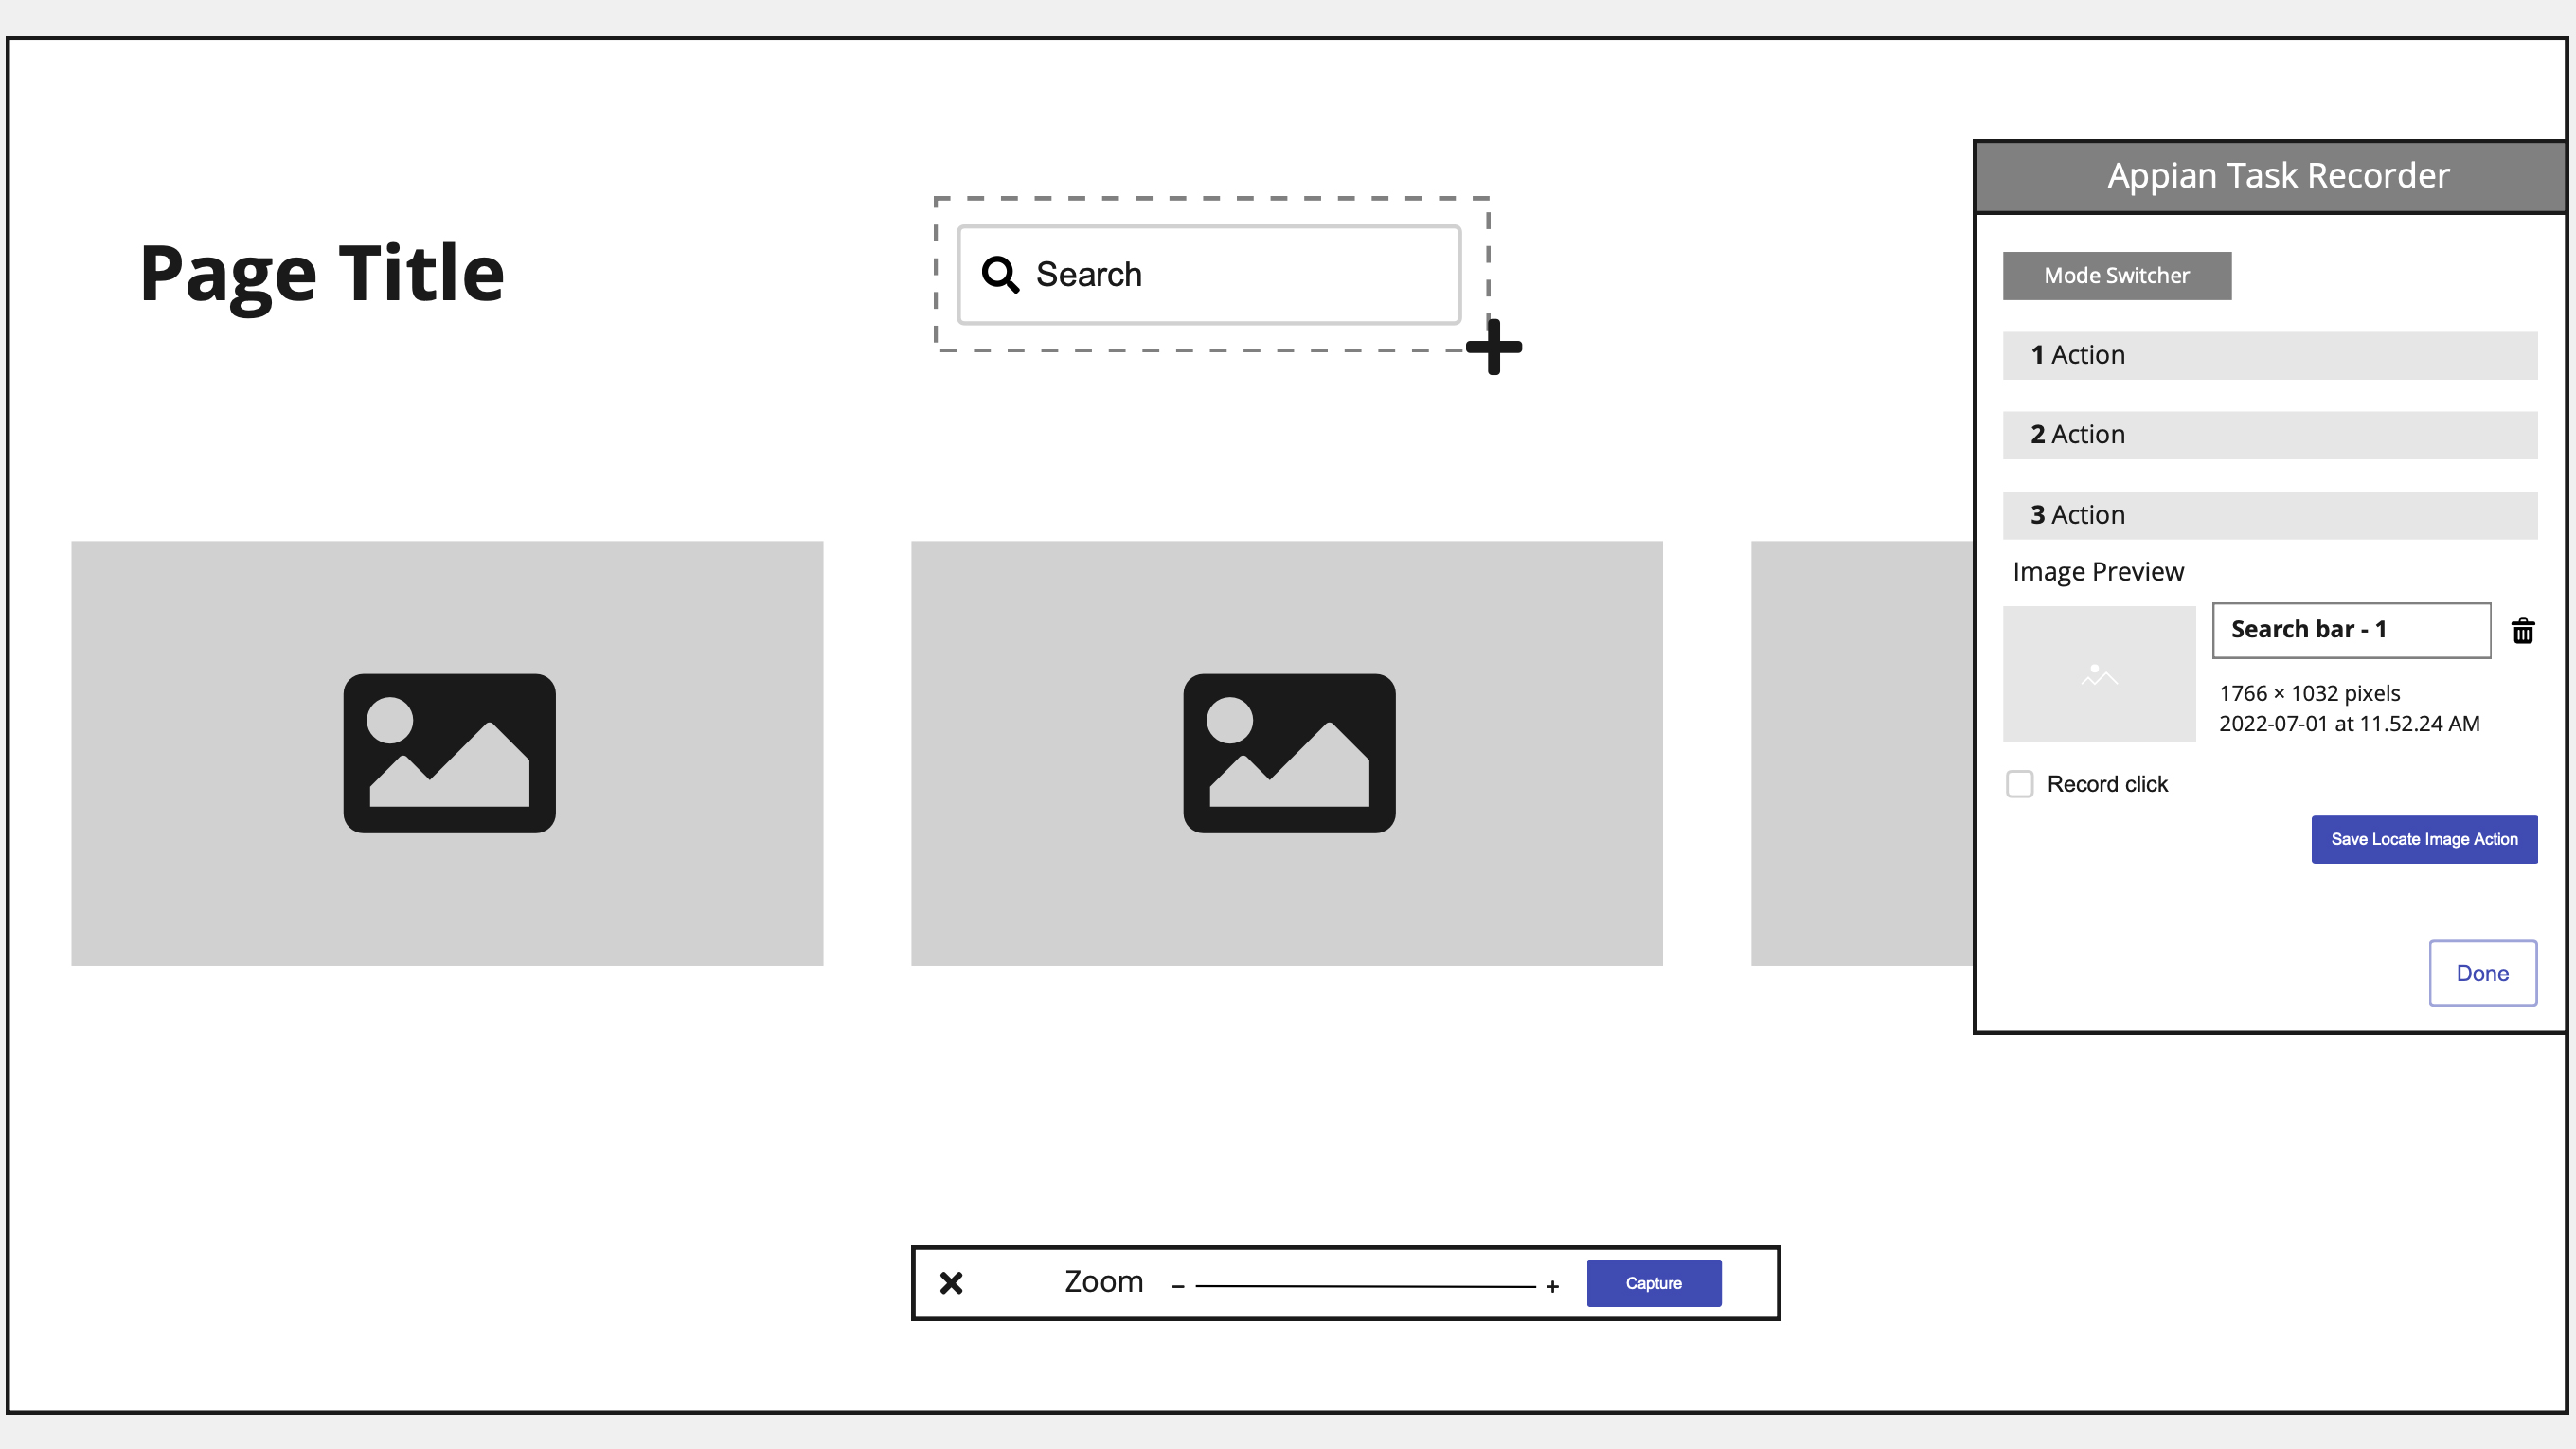
Create a [Locate Image Action]
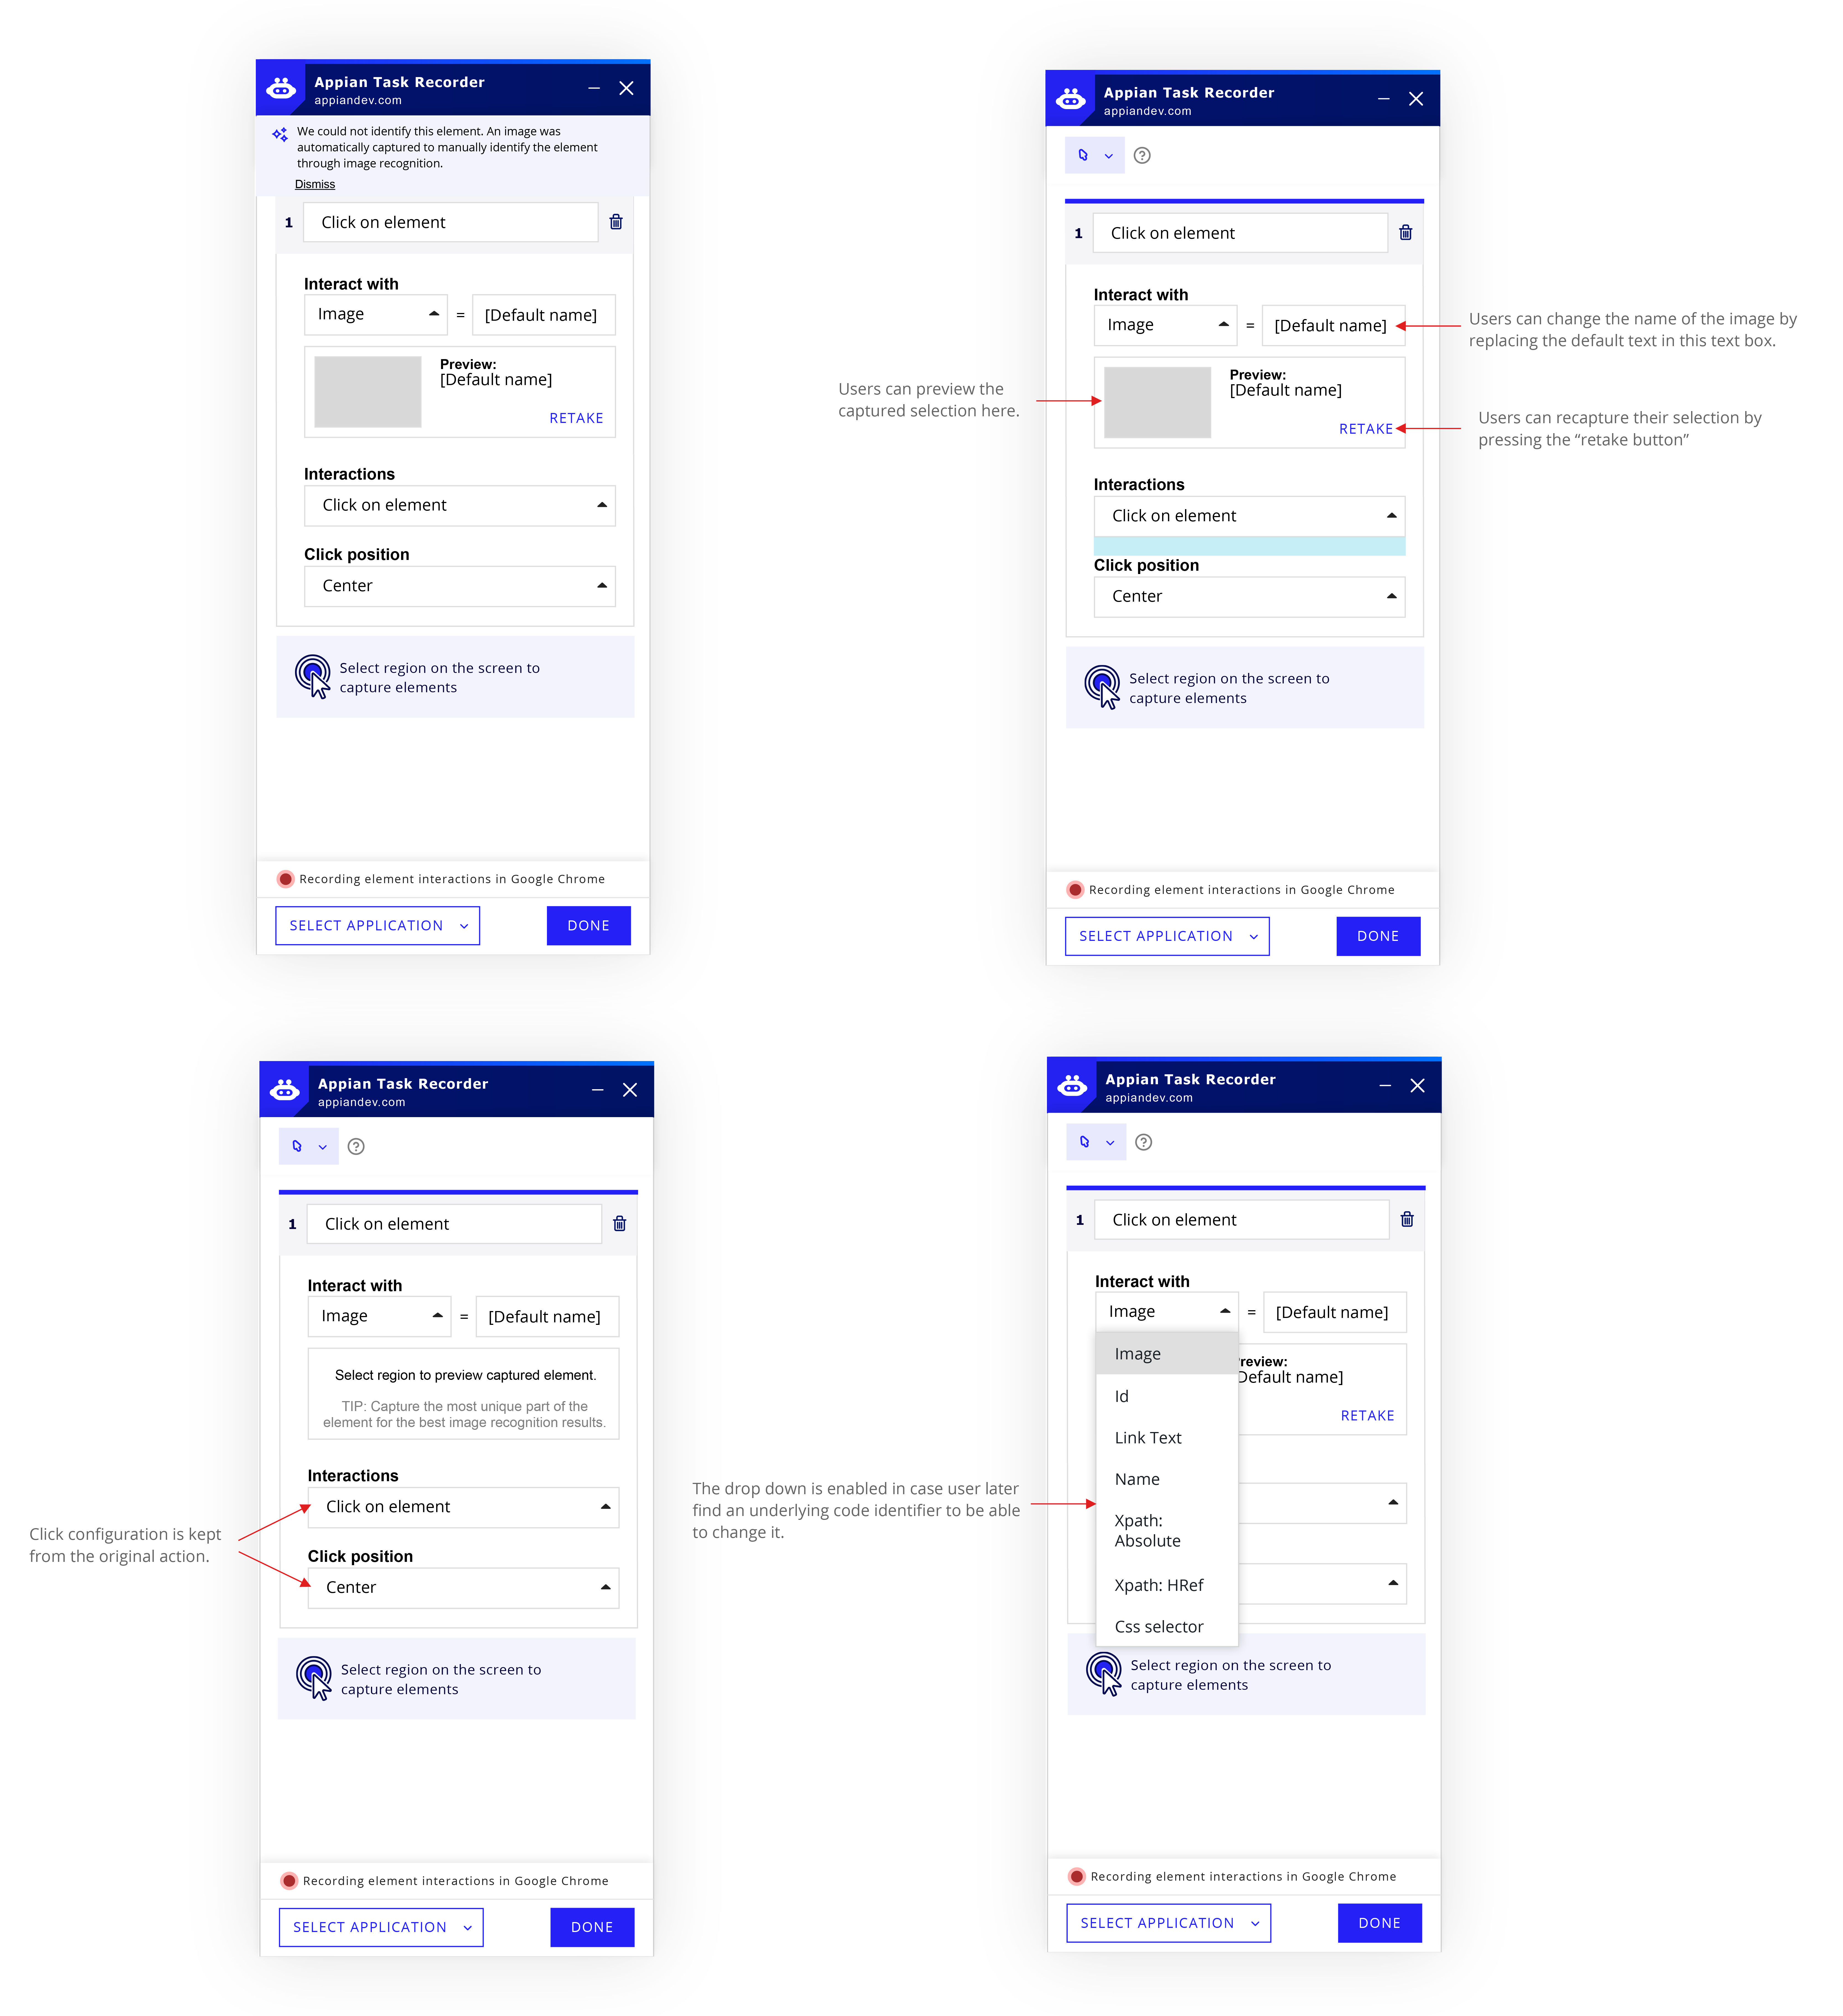
Upon entering image capture mode, the screen of the application/browser a user is on becomes static. Crosshair cursor allows user to take an image of the element they are trying to identify. After capturing a region, the below action displays in the task recorder.

Retake an image in the Task Recorder
After user presses the “retake” button, the screen becomes static and crosshair cursors allow the user to select a new region of the screen.

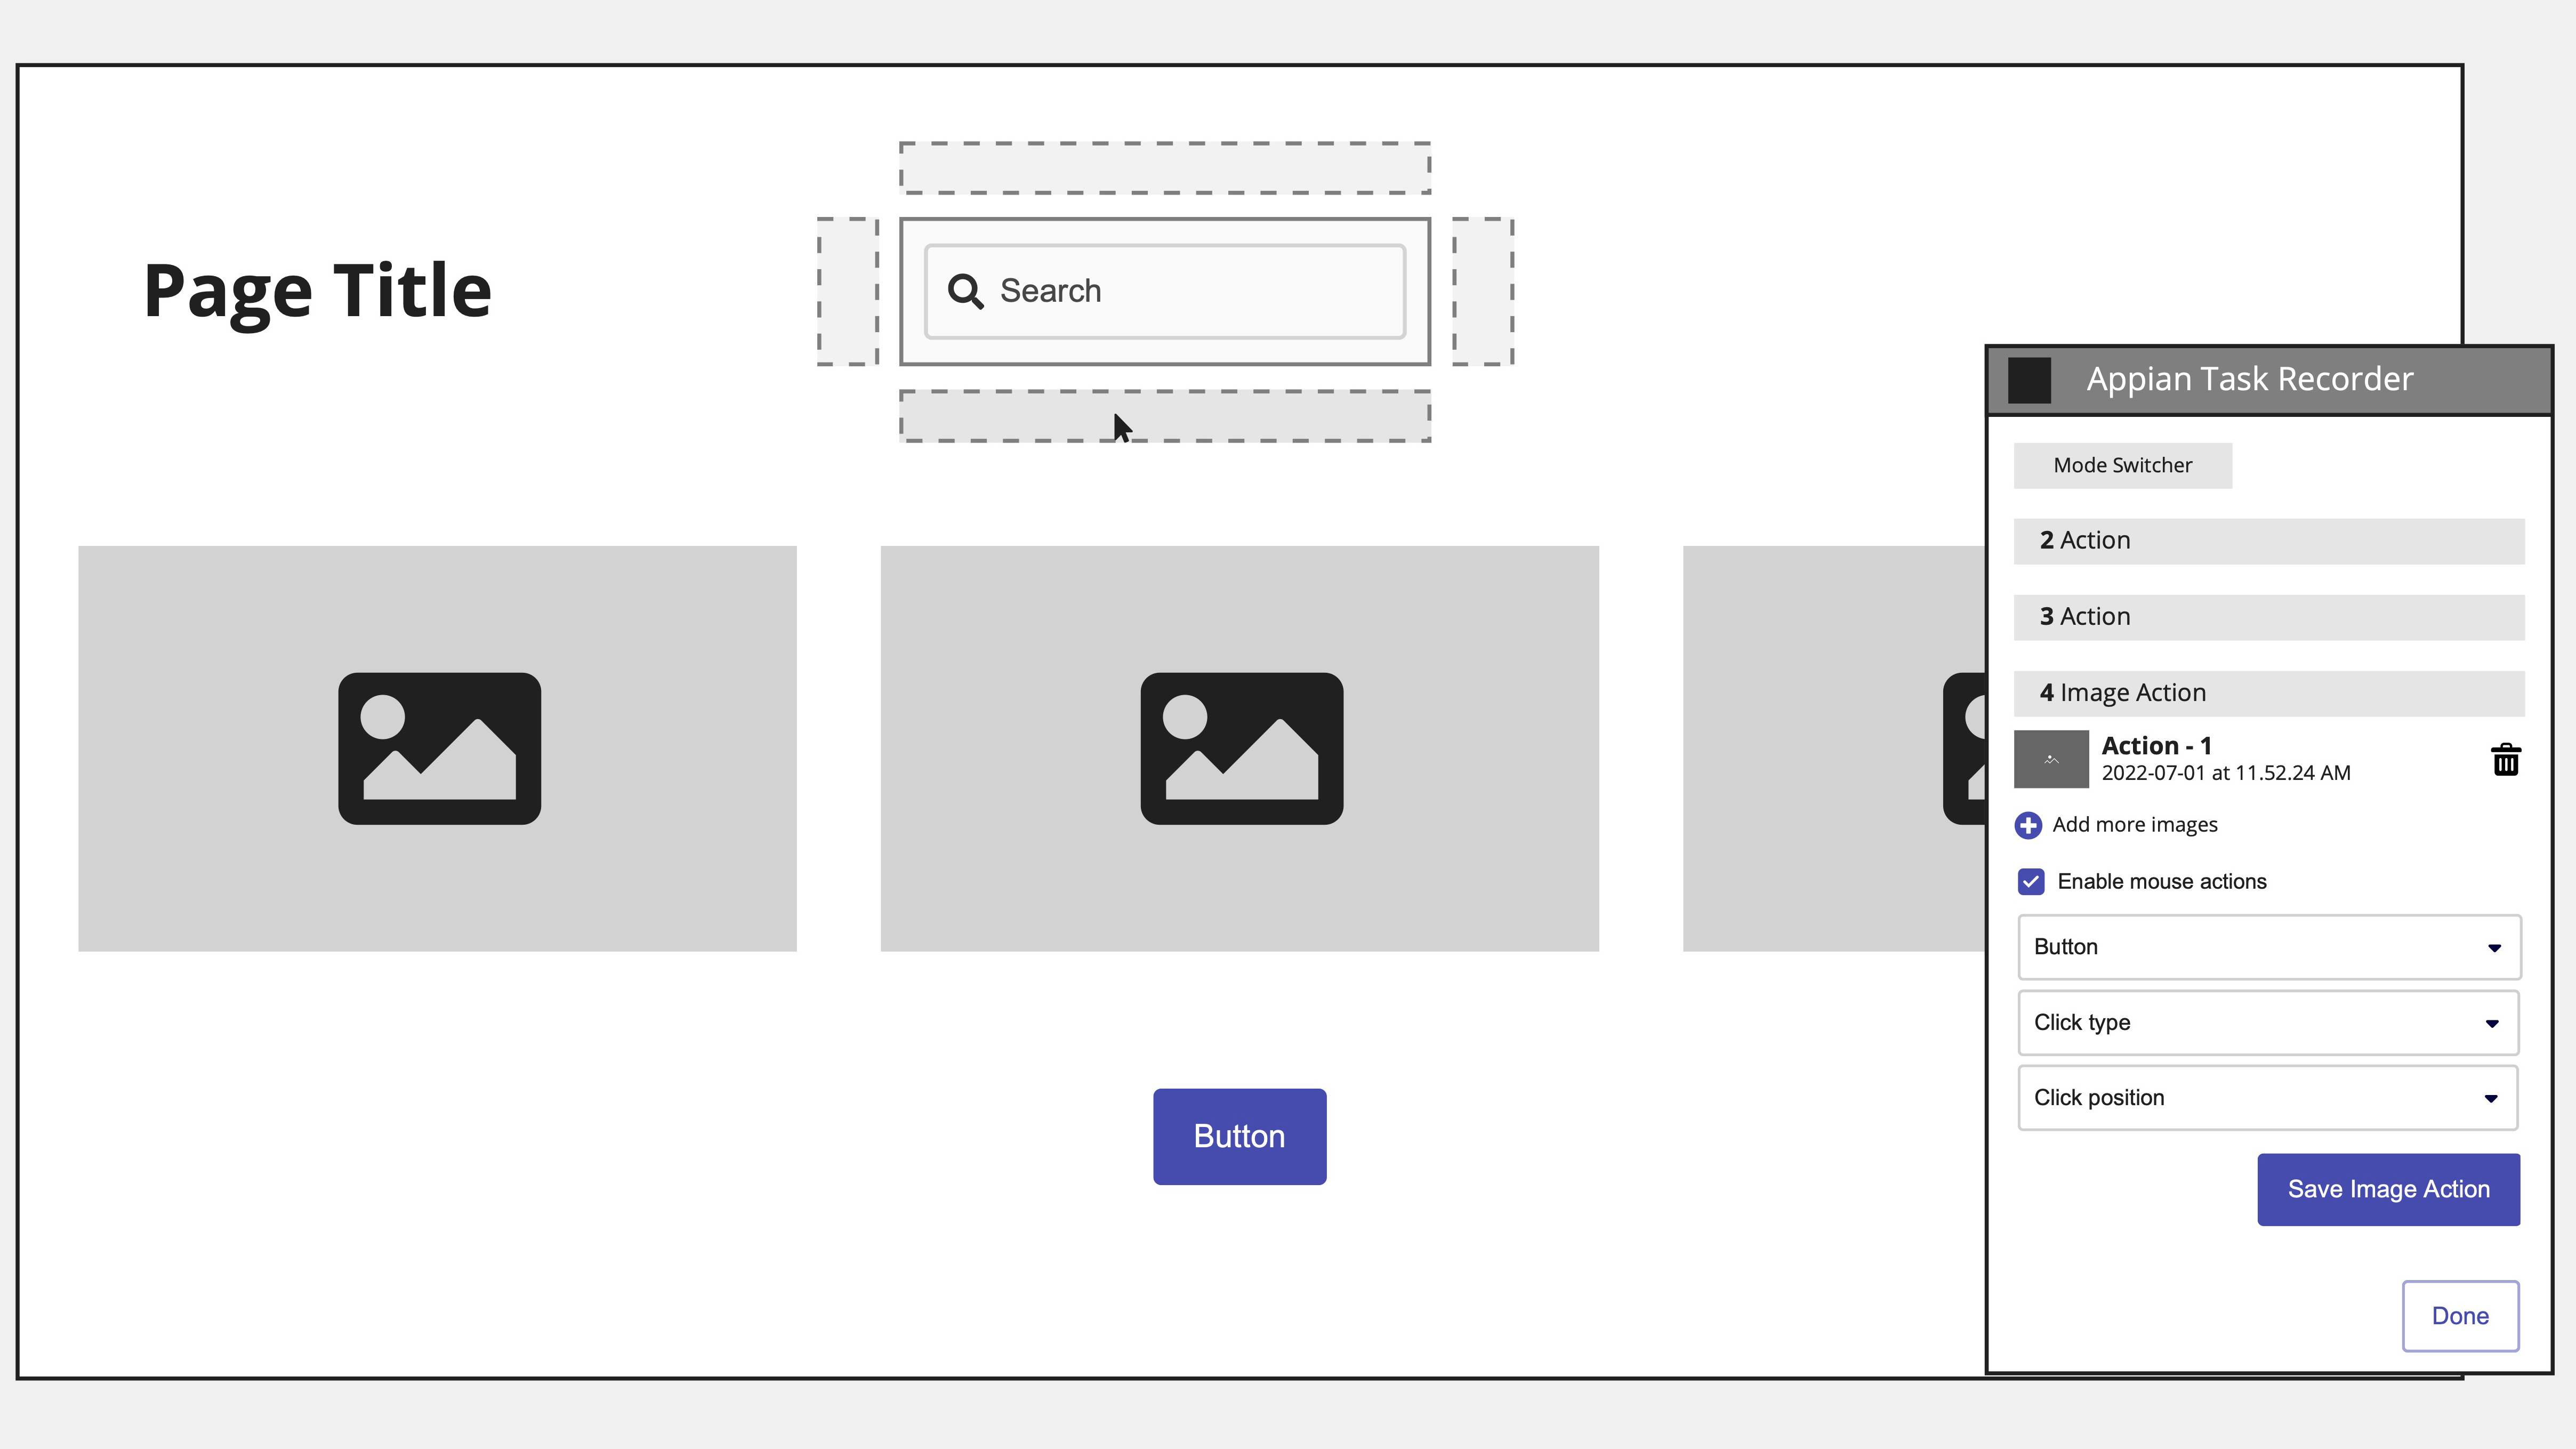
Configure a Click Action
By default, an image capture will have the interaction “Is element present.” To configure a click on the element captured via image, the user can:
A) click on the screen to automatically record the action in the Task Recorder
B) manually change the interaction type to “Click on element.”


Capture another [Locate Image Action]
After a user finishes configuring an action in the Image Capture Mode, they will be returned to Interaction Mode. They can create a new [Image Capture Action] by:
A) Using a keyboard shortcut to make the screen static and enable crosshairs (*this shortcut can be used at any time to take an image and enter image capture mode, if not in it already)
B) Manually switch to Image Capture mode using the mode switcher.
We also explored having an “Add Image” button below the current action to allow users to add another action while already in Image Capture mode.

Usability Testing
User Testing Scenario
Appian developer to develop a robotic process to enter in customer information through the Orders app using Task Recorder through a Citrix Vitrual Machine.
Testing Data
- 4/5 users tried to configure click actions in the recorder before clicking on screen
- 5/5 users first tried interacting with the elements before switching into image capture mode
- 4/5 users had difficulty understanding how to take an additional image in image capture mode
- 5/5 users think setting the default interaction as “is element present” makes sense
- 3/5 users were confused on what area they should capture for the best results
Analysis
Testing showed that users generally understood Image Capture Mode and found it helpful. However, users had difficulty discovering workflow behaviors, including when to switch into Image Capture Mode, how to capture additional images, and what screen area to select for the best results
Results
These findings guided us to design a notification system to switch to Image Capture Mode when the system can't access to an element's underlying code, explore an "Add More" button for capturing multiple images, and advocate to Product on developing an Image Capture guide.
Pushing UX Forward: Best Case Scenario
We designed the Image Capture Mode following the logic of Interaction Mode, i.e. using image as the identifier. The user flow and Task Recorder design is consistent with how users would interact when there is access to underlying code.
The element is no long undetectable — it can now be detected by image capture. This means we wouldn't need a separate Image Capture Mode if we can program automatic image capture.
Automatic image capture when users interact with an undetectable element in Interaction Mode
When users interact with an uninteractable element (no access to the code), the task recorder will automatically capture a screenshot of the element and record the interaction (click).
Meanwhile, no notification on the screen and the mode switcher is shown as in the MVP feature, because:
1. the element becomes a supported element through identifying with the image, and
2. users don’t need to switch to image capture mode to capture a screenshot.
In the task recorder, the identifier of the element becomes “image”, and a preview of the image is shown. The user flow and Task Recorder design is consistent with how users would interact when there is access to underlying code.
After presenting the Best Case Scenario design, our Engineering team agreed that automatic screen capture will take longer to develop, thus working on the MVP design is the top priority. However, everyone agreed that automatic screen capture makes the most sense to users, and would be added to future sprints.
The fact that both design options were easily understood by our Engineering team proves it's a great UX piece.